

Now IS THe Time To...

Crawl Space Services In Knoxville, TN
Stetson Howard: 865-432-6743
CRAWL SPACE ENCAPSULATION, REPAIR, WATERPROOFING & MOLD REMOVAL
No-Obligation, Free Inspections
No-Obligation Free Estimates
We Warranty All of Our Work
100% Satisfaction Guaranteed
Effective water management is essential for maintaining the health, safety, and longevity of any home. Properly managing water around the property helps prevent a range of issues that can compromise the structural integrity of the house and negatively impact the living environment. From safeguarding the foundation to preserving the landscape, a well-designed water management system is a crucial component of home maintenance.
One of the primary benefits of effective water management is the protection it offers to the foundation. Water accumulation around the foundation can lead to soil expansion and contraction, which may cause cracks and structural damage. By directing water away from the foundation through efficient drainage systems, homeowners can prevent costly repairs and ensure the stability of their home.
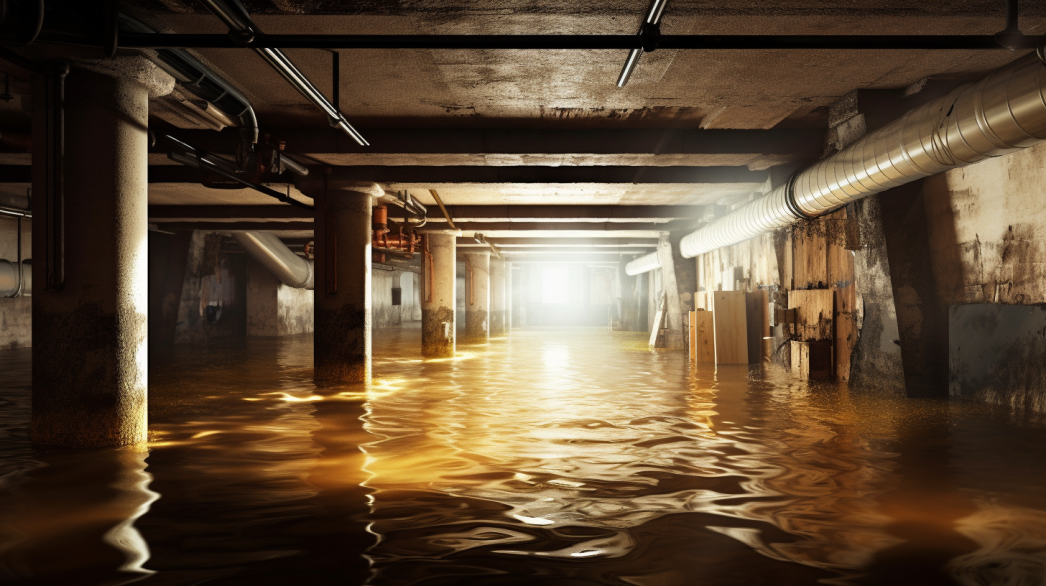
Additionally, effective water management helps prevent basement flooding and moisture intrusion. Basements are particularly vulnerable to water damage, which can result in mold growth, poor indoor air quality, and damage to stored belongings. Proper drainage solutions, such as sump pumps and French drains, help keep basements dry and reduce the risk of these issues.
Managing water runoff also plays a vital role in landscape preservation. Without adequate drainage, water can erode soil, damage plants, and create unsightly and hazardous conditions. Implementing solutions like gutters, downspouts, and swales ensures that water is effectively channeled away from the home and landscape, maintaining the aesthetic and functional quality of the property.
Furthermore, effective water management contributes to environmental sustainability. By controlling runoff and promoting natural infiltration, drainage systems help reduce the burden on municipal stormwater systems and protect local water bodies from pollution.
In this blog, we will explore the importance of effective water management around the home, discussing the benefits it provides and the potential risks of neglecting this critical aspect of home maintenance. Understanding the significance of proper water management is essential for homeowners looking to protect their investment, enhance their living environment, and promote a sustainable future.
Understanding Dry Wells
What is a Dry Well?
Definition: An Underground Structure That Collects and Disperses Runoff Water
A dry well is an underground structure designed to manage excess water from rain, runoff, or other sources by collecting and dispersing it into the surrounding soil. Typically, a dry well is a large, perforated container or a simple pit filled with gravel, placed beneath the ground to capture water and allow it to seep slowly into the earth.
Function: Helps Manage Excess Water by Allowing It to Slowly Infiltrate the Soil
Dry wells function by providing a storage area for excess water, which then gradually infiltrates the soil. This process prevents water from pooling on the surface and reduces the risk of flooding. The perforations or gravel-filled pit allow water to disperse evenly, promoting natural drainage and minimizing surface runoff. By facilitating this slow infiltration, dry wells help maintain the balance of the local water table and support healthy soil conditions.
Benefits of Dry Wells
Flood Prevention: Reduces Surface Water Accumulation
One of the primary benefits of a dry well is its ability to prevent flooding by reducing surface water accumulation. During heavy rains or snowmelt, excess water can quickly overwhelm traditional drainage systems, leading to pooling and potential flooding. A dry well acts as a buffer, capturing this excess water and gradually releasing it into the soil, thereby mitigating the immediate impact and preventing water from inundating low-lying areas or basements.
Soil Erosion Control: Minimizes Erosion by Controlling Runoff
Dry wells play a crucial role in controlling soil erosion by managing runoff. When water flows unchecked across the surface, it can erode soil, leading to unstable ground conditions and damage to landscaping. By capturing runoff and allowing it to infiltrate the soil gradually, dry wells help stabilize the soil and prevent the erosive effects of fast-moving water. This not only protects the landscape but also preserves the integrity of structures and pathways on the property.
Groundwater Recharge: Promotes Natural Groundwater Replenishment
Dry wells contribute to the natural replenishment of groundwater supplies. As water infiltrates through the dry well and percolates into the soil, it replenishes the local aquifer. This process is vital for maintaining the water table and ensuring a sustainable supply of groundwater, which is essential for wells, irrigation, and local ecosystems. By promoting groundwater recharge, dry wells help sustain the environment and support long-term water resource management.
In conclusion, understanding dry wells and their benefits is crucial for effective water management around your home. By incorporating dry wells into your drainage strategy, you can prevent flooding, control soil erosion, and promote natural groundwater recharge, thereby protecting your property and contributing to environmental sustainability.
Assessing Your Site
Site Selection
Location: Choose a Spot Away from the Foundation and Septic Systems
Selecting the right location for your dry well is crucial for its effectiveness and to avoid potential complications.
- Distance from Structures: Place the dry well at least 10 feet away from the foundation to prevent water from seeping into the basement or causing structural damage. Ensure it's also positioned far from septic systems to avoid contamination and ensure both systems function correctly.
- Optimal Placement: Look for a naturally low-lying area in your yard where water tends to accumulate. This will help the dry well collect and manage runoff more effectively.
Soil Type: Ensure Soil Has Good Drainage Properties
The soil's ability to drain water is a critical factor in the effectiveness of a dry well.
- Soil Testing: Conduct a soil percolation test to determine the drainage properties of the soil. This involves digging a hole, filling it with water, and measuring the time it takes for the water to drain. Sandy or loamy soils typically have good drainage properties, while clay soils may require additional measures to improve drainage.
- Soil Amendments: If the soil has poor drainage, consider amending it with gravel or sand to enhance its permeability. This will ensure that the dry well can effectively manage and disperse water into the ground.
Water Flow Analysis
Runoff Patterns: Identify Where Water Naturally Accumulates
Understanding how water flows on your property is essential for effective site assessment.
- Observation: Observe your property during and after a rainstorm to identify areas where water naturally accumulates. Note the paths that runoff follows and the locations of any pooling.
- Mapping: Create a map of your property highlighting the runoff patterns and accumulation points. This visual aid will help you determine the best location for the dry well and ensure it intercepts and manages water effectively.
Volume Estimation: Calculate the Amount of Water the Dry Well Needs to Handle
Accurately estimating the volume of water your dry well needs to handle ensures it is adequately sized and effective.
- Catchment Area: Calculate the catchment area that will drain into the dry well, including roof areas, driveways, and other impervious surfaces. Multiply the area by the average rainfall depth to estimate the total volume of runoff.
- Capacity Calculation: Based on the volume estimation, determine the size and depth of the dry well needed to handle the expected water load. Ensure the dry well is large enough to accommodate peak runoff during heavy rain events to prevent overflow and maximize efficiency.
In conclusion, assessing your site for a dry well involves careful consideration of location, soil type, and water flow patterns. By choosing an optimal spot away from the foundation and septic systems, ensuring good soil drainage, and accurately estimating water volume, you can design an effective dry well that manages runoff, prevents flooding, and supports sustainable water management practices.
Designing the Dry Well
Sizing the Dry Well
Capacity Calculation: Based on Runoff Volume and Soil Absorption Rate
Properly sizing your dry well is essential to ensure it can handle the volume of runoff and facilitate effective water absorption into the soil.
Runoff Volume: Calculate the runoff volume by determining the catchment area that will drain into the dry well. This includes the roof area, driveways, and other impervious surfaces. Multiply the catchment area by the average rainfall depth to estimate the total volume of runoff.
Soil Absorption Rate: Conduct a percolation test to measure the soil absorption rate. This involves digging a test hole, filling it with water, and timing how long it takes for the water to drain. This rate will help determine how quickly the dry well can disperse water into the surrounding soil.
Dimensions: Determine the Appropriate Size and Depth for Your Dry Well
Volume Requirements: Use the runoff volume and soil absorption rate to determine the necessary capacity of the dry well. A typical dry well should be able to handle at least the volume of a 1-inch rainfall event over the catchment area.
Size and Depth: Based on the calculated volume, determine the dimensions of the dry well. A common size for residential dry wells is 3-4 feet in diameter and 3-4 feet deep, but this can vary based on the specific needs of your property. Ensure the dry well is deep enough to handle the expected water volume while allowing for adequate soil absorption.
Material Selection
Gravel and Stone: Use Clean, Washed Gravel for Filling the Well
Gravel Selection: Use clean, washed gravel to fill the dry well. Gravel provides a porous medium that facilitates water storage and allows it to percolate into the surrounding soil.
Layering: Place a layer of gravel at the bottom of the dry well, followed by a perforated pipe (if used), and then continue filling the well with gravel up to a few inches below the surface. The gravel should be large enough to prevent soil from clogging the spaces between the stones, ensuring efficient water flow.
Perforated Pipe: Incorporate Perforated Pipes to Facilitate Water Distribution
Pipe Function: Perforated pipes help distribute water evenly throughout the dry well, enhancing the efficiency of water infiltration into the soil. The perforations allow water to enter and disperse, preventing localized saturation and promoting even drainage.
Installation: Place the perforated pipe horizontally at the bottom of the dry well or in a spiral configuration if space allows. Ensure the pipe is surrounded by gravel to maintain open spaces for water flow. Connect the pipe to the inlet from your downspouts or drainage system to direct water into the dry well effectively.
In conclusion, designing a dry well involves accurate sizing based on runoff volume and soil absorption rate, and selecting the appropriate materials such as clean, washed gravel and perforated pipes. By carefully planning the dimensions and incorporating the right materials, you can create an efficient dry well that effectively manages runoff, prevents flooding, and supports sustainable water management.
Installation Steps
Excavation
Digging the Pit: Excavate a Hole According to Your Design Specifications
The first step in installing a dry well is to excavate a hole that meets the dimensions and specifications determined during the design phase.
Marking the Area: Use stakes and string or spray paint to mark the perimeter of the pit according to your design specifications. Ensure the marked area aligns with the intended location away from the foundation and other structures.
Excavation: Dig the pit to the required depth and width. For a standard residential dry well, this is typically 3-4 feet in diameter and 3-4 feet deep. Use a shovel or a mechanical digger for larger projects. Ensure the sides of the pit are as vertical as possible to maximize the volume.
Safety Measures: Take necessary safety precautions during excavation, such as wearing protective gear and ensuring the stability of the excavation site to prevent collapse.
Soil Disposal: Properly Dispose of or Use the Excavated Soil
Soil Reuse: Consider reusing the excavated soil in other areas of your landscape. It can be used to fill low spots, build berms, or improve garden beds. Ensure the soil is free of debris and suitable for these purposes.
Proper Disposal: If the soil cannot be reused, dispose of it properly according to local regulations. This may involve transporting the soil to a designated disposal site or arranging for a disposal service.
Constructing the Well
Lining the Pit: Line the Pit with Geotextile Fabric to Prevent Soil Clogging
Lining the pit with geotextile fabric is essential to prevent soil particles from clogging the gravel and the perforated pipe, ensuring the long-term effectiveness of the dry well.
Selecting the Fabric: Choose a high-quality, permeable geotextile fabric designed for drainage applications. This fabric allows water to pass through while blocking soil particles.
Lining Process: Line the entire pit with the geotextile fabric, including the bottom and sides. Ensure there is enough fabric to fold over the top of the gravel once the pit is filled. Secure the fabric in place by temporarily weighting it down with rocks or gravel.
Adding Gravel: Fill the Bottom of the Pit with a Layer of Gravel
Gravel Layer: Add a 2-3 inch layer of clean, washed gravel to the bottom of the pit. This initial layer provides a stable base for the perforated pipe and enhances water infiltration.
Additional Gravel: After placing the pipe, continue filling the pit with gravel, ensuring it surrounds the pipe and fills the pit up to a few inches below the surface. The gravel should be large enough to create ample space for water flow while preventing soil from filling the gaps.
Inserting the Pipe: Place the Perforated Pipe Vertically or Horizontally in the Pit
Pipe Placement: Position the perforated pipe in the pit according to your design. It can be placed vertically in the center of the pit or horizontally along the bottom. Ensure the pipe is surrounded by gravel to maximize water distribution and infiltration.
Connecting the Pipe: Connect the perforated pipe to the inlet pipe from your downspouts or other drainage sources. Ensure the connections are secure and watertight to prevent leaks and ensure efficient water flow into the dry well.
In conclusion, the installation steps for a dry well include careful excavation, proper soil disposal or reuse, and constructing the well by lining the pit with geotextile fabric, adding gravel, and inserting the perforated pipe. By following these detailed steps, you can create an effective dry well that manages runoff, prevents flooding, and promotes sustainable water management.
Backfilling and Finishing
Completing the Fill
Gravel Layers: Continue Adding Gravel Around the Pipe Up to the Top of the Pit
The next step in constructing a dry well involves completing the fill with gravel to ensure proper drainage and stability.
- Adding Gravel: After positioning the perforated pipe in the pit, continue adding clean, washed gravel around the pipe. Gradually fill the pit, ensuring the gravel is evenly distributed and surrounds the pipe completely. The gravel should create a porous medium that allows water to flow freely and disperse into the surrounding soil.
- Layer Management: Fill the pit with gravel up to a few inches below the surface. Ensure each layer of gravel is compacted slightly to eliminate air pockets but remains porous enough to facilitate water movement.
Final Layer: Cover the Top with More Geotextile Fabric and Soil
- Geotextile Fabric: Once the pit is nearly filled with gravel, fold the excess geotextile fabric over the top of the gravel layer. This final layer of fabric prevents soil from mixing with the gravel and clogging the drainage system, ensuring long-term effectiveness.
- Adding Soil: Cover the geotextile fabric with a layer of soil. The soil layer should match the surrounding ground level to blend seamlessly with the landscape. This soil layer will support vegetation growth and help restore the area aesthetically.
Surface Restoration
Ground Cover: Replace Sod or Plant Grass to Restore the Area
Restoring the surface area above the dry well is crucial for maintaining the aesthetic appeal of your landscape.
- Replacing Sod: If the area previously had grass, replace the removed sod to restore the lawn. Lay the sod evenly over the soil layer, pressing it down gently to ensure good contact with the soil for healthy growth.
- Planting Grass: Alternatively, plant grass seeds over the restored soil. Choose a grass variety that matches the existing lawn and is suitable for the local climate. Water the area regularly until the grass is well-established.
Landscaping: Consider Adding Decorative Elements to Integrate the Dry Well into Your Landscape
- Decorative Stones: Add decorative stones or gravel on the surface to create a visually appealing feature that also helps with water dispersion. This can enhance the landscape's aesthetic while serving a functional purpose.
- Plants and Shrubs: Consider planting drought-tolerant plants, shrubs, or ground cover around the dry well area. These plants can help stabilize the soil, prevent erosion, and add beauty to the landscape.
- Mulch: Apply a layer of mulch around the plants to retain moisture, suppress weeds, and improve the appearance of the area. Mulch also helps protect the soil and roots from extreme weather conditions.
In conclusion, backfilling and finishing a dry well involves completing the gravel fill, covering it with geotextile fabric and soil, and restoring the surface area. By replacing sod or planting grass and incorporating decorative landscaping elements, you can integrate the dry well into your landscape, ensuring both functionality and aesthetic appeal.
FAQs
Recent Blog Posts
Crawl Space News


Schedule Your FREE Crawl Space Evaluation!
Did you know YOU DON'T HAVE TO BE HOME for us to provide you with your 100% FREE crawl space inspection and report?
Call Us Today at: 865-432-6743

Forever Guard Crawl Space Encapsulation and Repair of Knoxville is a specialty crawl space waterproofing company that services the greater Knoxville, TN and surrounding areas.
Business Hours
Sunday: 7:00 AM - 7:00 PM
Monday: 7:00 AM - 7:00 PM
Tuesday: 7:00 AM - 7:00 PM
Wednesday: 7:00 AM - 7:00 PM
Thursday: 7:00 AM - 7:00 PM
Friday: 7:00 AM - 7:00 PM
Saturday: 7:00 AM - 7:00 PM
legal info