

Now IS THe Time To...

Crawl Space Services In Knoxville, TN
Stetson Howard: 865-432-6743
CRAWL SPACE ENCAPSULATION, REPAIR, WATERPROOFING & MOLD REMOVAL
No-Obligation, Free Inspections
No-Obligation Free Estimates
We Warranty All of Our Work
100% Satisfaction Guaranteed
Welcome to our in-depth exploration of the critical importance of sealing cracks and leaks in buildings and structures. In this blog, we delve into why addressing these seemingly minor issues promptly is not just a matter of routine maintenance, but a vital aspect of safeguarding the integrity and longevity of your property.
Understanding the Impact of Unaddressed Cracks and Leaks
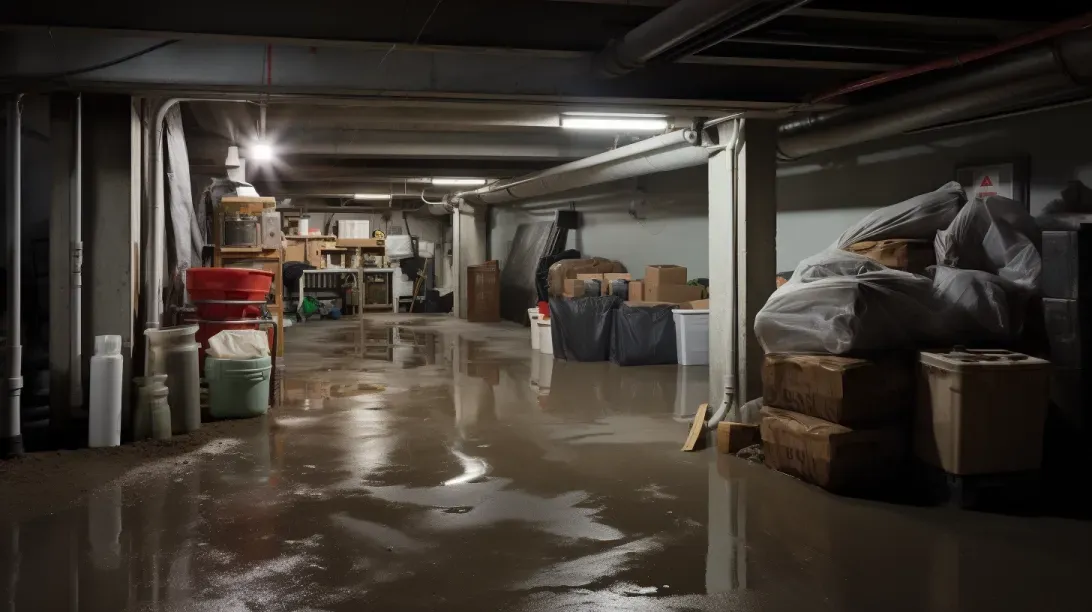
Cracks and leaks, often dismissed as minor annoyances, can escalate into major problems if left unattended. These breaches in the structural integrity of a building are more than just cosmetic flaws; they are open invitations for a host of complications. Water infiltration, one of the most common consequences of unsealed cracks and leaks, can lead to significant damage. Moisture seeping into walls, floors, and foundations can cause mold growth, weaken structural components, and even attract pests.
The Domino Effect of Neglect
The progression from a small crack to a major structural issue is not just a possibility but a likely outcome if preventive measures are not taken. Over time, the continuous cycle of water seepage and drying can enlarge cracks, exacerbating the problem. In colder climates, the freeze-thaw cycle can accelerate this damage. Furthermore, the presence of moisture can lead to corrosion in metal structures and rot in wooden components, compromising the building's safety and stability.
Proactive Measures for Long-Term Protection
This blog aims to highlight the importance of proactive measures in dealing with cracks and leaks. By understanding the potential risks and learning how to effectively address these issues, property owners can prevent costly repairs and maintain the structural integrity of their buildings. We will guide you through the best practices for identifying, assessing, and sealing cracks and leaks, ensuring your property remains safe, sound, and secure.
Join us as we navigate the intricacies of effective crack and leak management, providing you with the knowledge and tools to protect your investment against the ravages of time and nature.
Identifying Cracks and Leaks in Your Home
Detecting and addressing cracks and leaks in your home is crucial for maintaining its structural integrity and preventing potential damage. This section will guide you through identifying common areas where these issues occur and assessing their severity to determine the appropriate course of action.
Common Areas for Cracks and Leaks
Listing Typical Locations
Cracks and leaks can occur in various parts of a home. Common areas include:
- Windows and Doors: Check for gaps or cracks in the frames, which can allow water to seep through.
- Walls and Ceilings: Look for visible cracks, peeling paint, or discoloration, which can indicate moisture intrusion.
- Roof: Missing or damaged shingles and tiles can lead to leaks.
- Basement and Foundation: Watch for cracks in the walls or floors, as these can be entry points for water.
- Plumbing Fixtures: Regularly inspect under sinks, around toilets, and near water heaters for signs of leaking.
Tips for Detecting Hidden Leaks
Hidden leaks can be more challenging to detect. Here are some tips:
- Monitor Water Bills: An unexplained increase in water usage can indicate a leak.
- Use a Moisture Meter: This tool can help detect moisture behind walls and under floors.
- Listen for Dripping Sounds: Sometimes, the sound of water can lead you to a leak.
- Check for Musty Odors: Persistent musty smells can be a sign of hidden moisture.
Assessing the Severity
How to Determine the Severity of Cracks and Leaks
Assessing the severity of cracks and leaks involves several considerations:
- Width and Length of Cracks: Wider or longer cracks are generally more serious.
- Location: Cracks in load-bearing walls or foundations are more concerning.
- Water Quantity: Small, occasional drips are less severe than continuous or large leaks.
- Signs of Damage: Indicators like mold growth or wood rot signify more serious issues.
- When to DIY and When to Call a Professional
Deciding whether to handle the issue yourself or call a professional depends on the assessment:
- DIY: Small, superficial cracks or minor leaks in non-critical areas can often be addressed with DIY methods.
- Professional Help: Large cracks, structural concerns, persistent leaks, or if you're unsure about the severity, it's best to consult a professional. They can provide a thorough assessment and appropriate solutions.
Materials and Tools for Sealing Cracks and Leaks
Effectively sealing cracks and leaks is essential for maintaining the integrity of your home. The right materials and tools are crucial for a successful repair. This section will guide you through choosing the appropriate sealants for different types of cracks and leaks, and list the essential tools needed for the job, along with tips for their proper usage.
Choosing the Right Sealant
Introduction of Different Types of Sealants
There are several types of sealants available, each suited for different applications:
- Silicone Sealants: Highly flexible and waterproof, ideal for areas exposed to temperature changes and moisture, such as bathrooms and kitchens.
- Acrylic Sealants: Best for sealing gaps in windows, doors, and walls. They are paintable and suited for interior use.
- Polyurethane Sealants: Known for their durability and strength, these are suitable for larger cracks and outdoor applications, including around foundations and in driveways.
- Guidance on Selecting the Appropriate Sealant for Different Surfaces
Choosing the right sealant depends on the surface material and the location of the crack or leak:
- For Wet Areas: Use silicone sealants as they resist mold and mildew.
- For Paintable Surfaces: Acrylic sealants are preferable as they can be painted over to match the surrounding area.
- For High-Stress Areas: Polyurethane sealants are ideal due to their strength and flexibility.
- H3: Essential Tools for the Job
- List of Tools Needed for Sealing Cracks and Leaks
To effectively seal cracks and leaks, you will need the following tools:
- Caulking Gun: For applying sealant smoothly and evenly.
- Putty Knife: Useful for removing old sealant and smoothing the new application.
- Utility Knife: For cutting away old sealant and opening sealant tubes.
- Cleaning Supplies: Such as a wire brush, cloth, and cleaning solution to prepare the surface.
- Gloves and Safety Glasses: To protect your hands and eyes during the work.
Tips for Proper Tool Usage
- Caulking Gun: Cut the tip of the sealant tube at a 45-degree angle for better control. Apply steady pressure for an even flow.
- Putty Knife: Use a flexible putty knife for smoothing sealant in narrow spaces.
- Surface Preparation: Ensure the surface is clean and dry before applying the sealant for optimal adhesion.
- Safety First: Always wear gloves and safety glasses to protect against accidental spills and splashes.
Step-by-Step Guide to Sealing Cracks and Leaks
Sealing cracks and leaks is a vital maintenance task that can prevent further damage to your home. This guide provides a detailed walkthrough of the process, from preparing the area to applying the sealant, and ensuring proper drying and curing for effective and long-lasting results.
Preparing the Area
Instructions for Cleaning and Prepping Surfaces Before Sealing
Proper preparation of the surface is crucial for effective sealing:
- Clean the Area: Remove any dirt, debris, or old sealant using a wire brush or putty knife. For tougher residues, use a cleaning solution suitable for the surface material.
- Rinse and Dry: After cleaning, rinse the area with water and let it dry completely. Any moisture on the surface can hinder the sealant's adhesion.
- Importance of a Dry, Clean Surface for Effective Sealing
- A clean and dry surface ensures that the sealant adheres properly and forms a watertight barrier. Any contaminants or moisture can weaken the seal, reducing the effectiveness of your efforts.
Applying the Sealant
Detailed Steps for Applying Sealant to Cracks and Leaks
Follow these steps for a successful application:
- Choose the Right Sealant: Based on the location and type of crack or leak, select a suitable sealant (silicone, acrylic, or polyurethane).
- Cut the Sealant Nozzle: Cut the nozzle at a 45-degree angle to match the size of the crack or gap.
- Load the Caulking Gun: Insert the sealant tube into the caulking gun and apply steady pressure to start the flow.
- Apply the Sealant: Hold the gun at a consistent angle and drag it along the crack, ensuring even coverage. Fill the crack completely without overfilling.
- Smooth the Sealant: Use a wet finger or a smoothing tool to press the sealant into the crack and smooth the surface.
Techniques for a Smooth, Clean Finish
- Steady Hand: Keep your hand steady and maintain consistent pressure for an even application.
- Tooling: After application, use a damp cloth or sponge to clean up excess sealant and shape the bead for a neat finish.
Drying and Curing Time
Information on the Drying and Curing Process
The drying and curing time for sealants can vary:
- Read the Label: Check the manufacturer's instructions for specific drying and curing times.
- Typical Drying Time: Most sealants dry to the touch within a few hours but may take longer to fully cure.
Tips to Ensure Optimal Sealing and Longevity
- Avoid Water Contact: Keep the sealed area dry until the sealant has fully cured.
- Temperature and Humidity: Be aware that high humidity and low temperatures can extend drying and curing times.
- No Disturbance: Avoid touching or applying pressure to the sealant during the curing process.
Preventing Future Cracks and Leaks
Preventing cracks and leaks is crucial for maintaining the structural integrity and health of your home. Proactive measures and regular maintenance can significantly reduce the risk of such issues. This section will guide you through establishing routine inspections and implementing preventative strategies to safeguard your home.
Regular Maintenance Checks
Scheduling Routine Inspections to Catch Issues Early
Regular inspections are key to early detection of potential problems:
- Set a Schedule: Plan for bi-annual or annual inspections, especially after extreme weather conditions.
- Professional Assessments: Consider hiring professionals for thorough inspections periodically.
Key Areas to Monitor Regularly
Certain areas are more prone to cracks and leaks and should be monitored closely:
- Roof and Attic: Look for missing shingles, signs of water intrusion, or blocked vents.
- Basement and Foundation: Check for any cracks in the walls or floors, and signs of moisture.
- Windows and Doors: Inspect for gaps, damaged seals, and proper drainage.
- Plumbing System: Regularly examine pipes, fittings, and under sinks for any signs of leaks.
- Exterior Walls: Look for cracks or damage in the siding or paint.
Preventative Measures
Strategies to Prevent Cracks and Leaks
Implementing the following strategies can help prevent the occurrence of cracks and leaks:
- Proper Insulation: Ensure your home is well-insulated to prevent condensation and moisture buildup.
- Humidity Control: Use dehumidifiers or air conditioners to maintain optimal indoor humidity levels.
- Gutter Maintenance: Keep gutters and downspouts clean and in good repair to prevent water accumulation near the foundation.
- Landscaping: Ensure the ground slopes away from your home to prevent water pooling.
- Sealant Refresh: Regularly check and refresh sealants around windows, doors, and other openings.
Importance of Addressing Root Causes Like Structural Issues
Beyond surface-level fixes, it's important to address any underlying structural issues:
- Foundation Checks: If you notice frequent cracks, have your foundation assessed for potential problems.
- Drainage Solutions: Poor drainage can lead to water accumulation and structural damage. Ensure adequate drainage systems are in place.
- Building Material Quality: Use high-quality, durable materials for any repairs or renovations to prevent future issues.
When to Seek Professional Help
While DIY approaches can be effective for minor repairs, certain situations necessitate professional intervention. Understanding when to call in experts is crucial for ensuring the safety and integrity of your home. This section will help you recognize complex issues that require professional help and guide you in finding and choosing the right contractor or specialist.
Recognizing Complex Issues
Identifying Situations That Require Professional Intervention
Some scenarios where professional help is essential include:
- Structural Damage: If you notice significant cracks in the foundation, walls, or ceilings that suggest structural issues, it's time to consult a professional.
- Persistent Water Leaks: Ongoing leaks, especially those that are difficult to locate or involve major plumbing, require expert attention.
- Electrical Issues: Any repair that involves electrical wiring should be handled by a licensed electrician to avoid safety hazards.
- Large-Scale Repairs: Projects that affect a large area or the entire home, like re-roofing or extensive water damage restoration.
- Risks of DIY in Complex Scenarios
Attempting DIY in complex situations can lead to:
- Increased Damage: Incorrect repairs can exacerbate the problem.
- Safety Risks: You might unknowingly compromise structural integrity or create fire hazards.
- Financial Loss: Mistakes in DIY repairs can be costly to rectify later.
- H3: Finding and Choosing a Professional
Tips for Finding a Reliable Contractor or Specialist
To find a trustworthy professional:
- Seek Recommendations: Ask friends, family, or neighbors for referrals.
- Check Online Reviews: Look at reviews on trusted platforms to gauge the reputation and quality of work.
- Verify Credentials: Ensure the contractor is licensed, insured, and has relevant experience.
- Get Multiple Quotes: Compare quotes from different professionals to understand the market rate.
- Questions to Ask Before Hiring a Professional
Before finalizing a contractor, consider asking:
- Experience and Specialization: How long have they been in business? Do they specialize in the type of repair you need?
- References: Can they provide references from previous clients with similar projects?
- Timeline and Availability: How soon can they start, and what is the estimated duration of the repair?
- Warranty or Guarantee: Do they offer any warranty on their work?
- Cost Breakdown: Request a detailed quote to understand what you are paying for.
FAQs
Recent Blog Posts
Crawl Space News


